Showing posts with label homemade. Show all posts

Monday, November 29, 2021

One Day Builds: Ginkgo Prints for the Holidays


    These prints were a fun distraction from my normal technical pursuits. A career as a mechanical engineer and a lot of hobbies and projects involving engineering means I spend a lot of time with numbers and dimensions. Tweaking millimeters on a design so it looks just right, fits perfectly, and has the correct balance of weight and strength. Its fun, don't get me wrong; I'm lucky to make a living doing something I enjoy and that comes easily to me. It can be exhausting though when even your artistic expression involves chasing dimensions and tolerances (see my posts about the necklace build or spoon build).

    I've been having some technical burnout in my life recently. It just adds up. So, spur of the moment I decided to do a wood block print as part of the holiday gifts I'm making this year. A future post will cover the rest of the gift, but I wanted to write a bit about these prints.

    Nothing about these prints were really planned or ideal. The wood block is a scrap of plywood from furniture making. I don't have any chisels so I carved it with an X-Acto knife. The shape of the stem was determined by the need to fit it on the wooden block I had. No ink or ink pad, so I just used a Sharpie to ink the block. I thought I might get some nicer paper to print on, but instead I decided to reuse some paint samples I had from painting my apartment, trimming them square. 

    In some ways it reminds me of the engineering adage 'a good solution comes from a well defined problem.' Often it can be the easiest to work under strong limitations; it really narrows down what you can do and you don't waste time with all the 'what ifs' or 'we coulds'


    My home office is my dining room table which I share with my Ginkgo tree, Ola. As the seasons progress she has been dropping her leaves and it reminds me of walking in Oberlin, Ohio; a town a grew up near. I have fond memories of walking the Ginkgo lined downtown streets in fall, the air filled with the smell of rain and wet leaves, stepping into Ginkgo Gallery to look at the works of local artists.

    Tracing a fallen, golden leaf, a loose sketch guided my carving. Having a leaf to study was immensely beneficial to get the vein structure looking right; they curve differently than I really expected. Though I suppose this is part of the exercise; to learn about the little details you thought you knew and therefore overlooked. Carving random veins with no particular patterns is not trivial. I look at these prints and see the order I carved the veins in, and the subtle patterns those create. Thinking you're being clever by alternating the sides you branch new veins from and trying to be random and unplanned, only to see the distinct areas you worked in order. It reminds of the shading and crosshatching of artist Mary Azarian, or of the detailed hair of traditional Japanese wood cuts. It is doubtful any of my family and friends receiving these prints as gifts will notice, but it tells a story.

    A lot of the time I can get stuck in the analysis paralysis. A simple idea can turn into a complex project and before you know, you are never going to finish and its never going to be perfect. I liked this project because I really gave myself permission to not be perfect. To not over analyze and to not have a plan. I feel it really adds to the artistic expression; you're driven by instinct and intuition, rather than logic or experience or facts.

    Of course this approach isn't always appropriate, but here it was very relaxing. 

Sunday, October 6, 2019

An Engineer's Spoon

This project came about from a need for a kitchen spoon. Now you would think you could just buy one of those, but where is the fun in that? The bowl is machined 304 stainless steel, with an Osage Orange handle. I was inspired by a limited edition Le Creuset cast iron skillet I came across a few years ago. It was ridiculously expensive, but had a nice aesthetic where the wooden handle blended smoothly with the metal body. Around a year ago I needed a nice kitchen spoon. Growing up with wooden spoons, I gravitated towards that as a choice, but there weren't really any I liked and over time the wood really wears because its never hard enough.


The alternative is stainless but the handles on those aren't comfortable. Remembering the aesthetic of the skillet I liked, I designed a spoon. That spoon was never made. I designed it more as an experiment and didn't really think about how I use spoons when cooking and what manufacturing methods I have available to me. I shelved it and forgot about it for a bit. 


Earlier this year, we finally got our Okuma 5-axis up and running (same machine in the impeller post) and after a busy semester learning a new machine, control, writing a post processor, and making parts (more on those parts to come), I had time on the machine to make a spoon. I dusted off the old CAD model and made a bunch of changes. The bowl was slimmed down to fit the stock I had, the leading edge was thinned out to make scraping the bottom of pots easier, and some of the lines and tangencies were refined. I did all the modeling and programming in Fusion360, and since the first spoon design, they added some more features that helped me refine the look. 


Programming this was a good learning experience for 5 axis work. Stability was a big issue throughout as well as tool access. Off the machine I was quite happy with the finishes. This is due to the superior quality of Okuma, as well as having some really top notch Sandvik tooling. After machining, I just sawed the part off the remaining stock. At this point an interesting issue was presented to me; how do I drill the hole for the handle when there are no reference surfaces, flat or parallel edges or really any way to hold this part? I created an aluminum tool that was machined to be a perfect negative of the bowl. This gave me support over a large area, as well as rotational alignment to clamp it in tall jaws seen below. From there it was easy to indicate the round shank of the spoon and drill the hole. Last was the handle, which I completed over the summer. Very straightforward compared to the bowl. Osage Orange was used because it is very hard, strong, and moisture resistant. Ideal for use in a kitchen without the need for any finishing. Also it matches a kitchen knife handle I made a few years ago.


Having used this spoon for a few months now, I do have some lessons learned. First, weight distribution. The spoon has a heavy metal bowl and a very thin, wooden handle. Its front heavy. If I had thought of this, I could have checked center of gravity in CAD. Spoon still works fine but it takes some getting used to the unique weight distribution. Second, Loctite 380, my favorite adhesive, is not good at bonding to wood in high humidity environments. The joint has come loose over time, but the machined fit is so tight, that once the handle heats up at all in a pot, it swells enough that it won't come off; so no long term issues. Last, I would use a harder material next time. Maybe a 17-4 PH. Something that resists tapping on the edge of a skillet a bit better. 

Now all I need is a fork.....


Sunday, June 9, 2019

Liquid Oxidizer Impeller

At my school there is a model rocket group, Launch Initiative. They design, build and fly mid size model rockets. Typically they use purchased solid rocket motors, or hybrid (solid fuel, liquid oxidizer) motors they design and build. While working on some other projects, they are planning for the future and trying to push their engineering skills by designing a hybrid rocket motor with a oxidizer turbo pump.

This project was more of an experiment and test of skills, and this version wasn't intended to fly. Twofold to this project was the design and mathematical modeling of a pump impeller and turbine, and second to manufacture the pumps and impellers. The design was done by one of the Launch Initiative team members; I was only on board for the machining.


This is the second generation of pump impeller, made in aluminum. This machined one is scaled down from its original size to result in a roughly 4 inch (100mm) diameter. This scaling was done primarily for cost; I already had material for this smaller size. It was also done to replicate the size of what a final impeller would be. A flight ready version of this impeller would be out of stainless, and the turbine would be inconel. When I finished machining this impeller, the team had already progressed to the fourth generation of impeller which added splitter fins. 

All programming was done in Fusion360 with a custom post and run on an Okuma Genos M460V-5AX. Absolutely fantastic machine, no complaints with it. There is a real joy in using a machine that does what you tell it to first time, every time. I cannot say the same about Fusion for this type of work; not at all suited to it. I first tried to program the part with simultaneous 5 axis moves, but Fusion couldn't handle it. In the end I had to split all the faces up and do them as positional 5 axis moves. Visually not as good but these impellers would have to be polished before service anyway so this would be functional.

Cycle time on this was around 4 hours a part. This could definitely be cut down by pushing roughing and semi-finishing federates. Using a better CAM package to optimize the tool paths would also help. I have an Esprit license which is the preferred CAM for Okuma machines (they have a partnership and sponsor my school), and the machine simulation models are very accurate. 

Checking clearance inside the machine when testing
Fusion doesn't have machine simulation, so I was a little weary for some of the 5 axis moves. I had improvised a basic simulation that would prevent major crashes, but it was inaccurate for close clearances. There was a risk of crashing the back of the spindle into the table when rotated up at steep angles. This was solved by propping my camera on the trunnion inside the machine. From there I could stream to my smart phone and zoom and watch the clearance in critical areas. I would run the part dry with no stock at a slow speed to I had a hope of being able to react if something goes wrong.

The machining process was quite straightforward. Most of the tooling was Sandvik inserted, solid and drills. I used to be skeptical of the premium price of Sandvik solid carbide tooling. After using them for an extended period of time, I think they are worth the price. The carbide quality is just phenomenal and the cutters just last and last and last. Maybe if were paying for all the cutters out of pocket, I would change my tune but as long as work is buying them (or Sandvik is donating them).

Various stages of machining

In the end, this part was also used as a demo piece for an on-campus creativity festival. I put together a little display with the different stages of of machining seen above, along with the tools used and the chips they produce. This was to show to people who don't know about machining how a part is made. A lot of people thought these impellers were 3D printed and were surprised to find it was cut out of solid.

The project was fun. I think I made 6 of these in the end. I would like to revisit it eventually with a better CAM package. This was only my second 5 axis project and I made it with only 100h of 5 axis machine time under my belt.

Pretty reflections after roughing

Friday, January 4, 2019

One Day Builds: Micro Tripod

    Growing up I had one of the little, flexible "Gorilla" tripods. It worked alright but after a year of light use, some of the ball sockets cracked (made of ABS) and the legs no longer held their shape. The unit was also very bulky given what it could do. This past year at work, I was setting up a coolant manifold on a milling machine and the LocLine I was using reminded me of that old tripod. I had a planned a hiking trip to Vermont coming up and had been thinking about buying or making a tripod to shoot some time lapses.


    I threw together this little tripod in maybe an hour. It's printed on a FormLabs Form 2 in their Durable resin. I had wanted the LocLine to snap into the printed hub, which it does, but the printed material creeps too much over time and the LocLine flops around in the socket; it doesn't stay in position. I solved this by epoxying the first section of LocLine to the printed part. The screw on top is just screwed into the printed part, into printed thread. The short legs work well for most situations, and can always be extended if I feel the need for longer legs. Made of delrin, the LocLine shouldn't see any degradation over time, even if used in the Sun a lot. It's also easy to buy anywhere in the world. As it turns out my phone is much better at taking time lapses than my camera, but luckily the tripod is versatile.


Saturday, June 9, 2018

Elephant Desk

This whole project originated from finding a solid chunk of melamine coated MDF that came from a university desk. The legs on it broke and our facilities management was throwing it out. I made some new legs out of 75mm square tube with 5mm wall. The finished table weighs 60kg and feels like it "could hold an elephant". I tried something unique with the tripod design.

It works well as it never wobbles, but you can't sit on the edge of the table on the one leg side. The whole table comes apart and packs flat so I can easily move, store and transport it.


One Day Build: Strong Indicator Arm

For a while now I have been using one of these ubiquitous Swiss made indicator arms. It works okay but I've never been fully happy with it. They have too many joints and too much wiggle for precision work. Even on the best units I have seen problems with the indicator alignment when indicating small holes. The dovetail isn't perfectly radial with the stem and it side loads the contact point.


I wanted a better, simpler solution. I came up with this single pivot arm inspired by some cheap indicator arms I've seen. The clamp plates are hardened A2 and the shank is 60 case Thomson rod. The spherical surface on the clamp plates were surfaced on a CNC and match the spherical indents on the shank.


The screw is kinda cool. Its a standard SCHS with a little plastic knurled knob pressed on. I didn't know these existed until one of the toolmakers I work with bought some a job. The clamp gives just enough friction on the joint that it wont be knocked out of place, but can easily be adjusted by hand.


The little spring on the front of the clamp is just there to hold the clamp plates on the shank and the dovetail open when the indicator is not on the arm. Right from the start the radial alignment wasn't perfect. This this design, that alignment is easily adjusted by grinding the faces of the clamp plates to affect the angle the indicator is held at. With a bit of fiddling I got the contact tip to less than 0.25mm radial misalignment. 

This isn't a perfect solution for every application but it works perfect for any time you need an indicator in a mill spindle. Going forward I would make a second one of these with a 10mm reduced shank for using in my small drill chuck.

Example of the suspect indicator arm. Photo from wttool.com

Wednesday, May 9, 2018

Adjustable Prismatic Square


This small square was my first ever toolmaking project. I wanted a small square to use when squaring blocks in the mill. There wasn't material available to make a one piece square, and I'm still unsure about how silver soldered machinists squares are ground on all sides after assembly. So, the base and blade would have to be two pieces, and why not make them adjustable. I didn't go for a traditional rectangular blade like often seen in combination squares because grinding such a thin part would be very challenging, and grinding the mating slot nearly impossible.

Instead I used a square profile blade clamped at 45 degrees. This allows for easy clamping with the clamp remaining withing the edges of the base. The clamp is spring loaded so it loosens easily. The blade is made from a M2 HSS tool bit and the base is 1095. Its a fun little quirky square. I didn't do any formal design for this; no sketches even. As a result the proportions are a little clumsy but that doesn't effect its use.   

Close up of clamp with blade in a middle position


Small relief for checking an outside corner


Monday, April 30, 2018

Modular 18650 Battery V3

This is another post in the series about designing an electric moped. This post mainly details the system architecture and high level design. I avoid delving into the calculations I used. This post also doesn't cover BMS design and programming. This may be detailed in a future post.

For designing the battery I focused on the maximum power draw required. For my intended use - running around town while at school - I'm not particularly focused on range. While I aim for a 100km range, I don't have enough information about my preliminary designs to know if this is possible. I began by calculating maximum power required. The motor will draw maximum power when accelerating so I decided on required power from my desired acceleration.

The calculations are kept simple, and ignored air resistance; I have calculated air resistance but it wasn't significant enough, especially during acceleration to warrant factoring it into the calculations. For my vehicle target weight, and wheel size, I decided I need to be able to supply a sustained 5kw.  To avoid needing an impractical amount of current, I aimed to keep the volts to amps ratio at 1:1. Because the micro controller I want to use has only 16 analog inputs, this means I can monitor at most 16 cells in series. Working this in to my target voltage/current ratio of 1:1, I settled on a battery topology of 16s20p. This gives a maximum power output 6.4kw at 5 Amps/cell, and a nominal power output of 2.9kw at 2.5 Amps/cell.

But enough of murky math, on to the design details. I decided I wanted a modular batter for several reasons. First was cost; I could start with fewer modulus and in case this whole thing didn't work out or I couldn't make it safe enough, I wouldn't be out a lot of cash in cells. If it did work, I could add more modulus later. Second was charging. Interfacing with a type 2 EV charger isn't particularly difficult, but it provides 240 volts, and the power supplies I would need to charge the battery would cost a lot, weigh a lot, and take up a lot of space. Charging on 120 volts wouldn't really make it any better as a high voltage and current would still be required.

The modular battery system allows modulus to be removed individually for charging. Its a novel idea and isn't practical for larger, or production vehicles. For a small moped, its a cool idea. I really like the physicality of removing modulus to charge them; it gives you a close connection to the bike. The BMS would signal to the rider what modulus need to be removed for charging. When a socket is not in use, it could be bridged with a jumper. The BMS could easily recognize the jumper and make appropriate adjustments.

The first sketches of the modular battery packs used a pivoting arrangement, with the loose end being held in by a rubber draw latch. This proved too complex for connectors between the pack and bike, as well as for waterproofing the modulus and the connections. The second idea was to use racks the modulus would slide into. The racks would be inside a waterproof enclosure with only 2 doors. This simplified connections and solved the waterproofing problem. This also made cooling much easier as forced air cooling in the battery box could now be used.

My first iteration of this design used mostly machine parts screwed together. I wanted all the module frames to be insulating and fire retardant if possible. End plates machine of polycarbonate spaced out by water jetted G10 spacers. This design was going to be expensive for fasteners, materials, and time. It also had stiffness issues, and would most likely suffer from cracking around the screws. After playing with it for a bit, I let it rest for a few months while I reevaluated.
First machined version of the rack mount modules
I don't remember where the idea came from, but I wanted to try the rack mount modules with 3D printed frames. I don't generally like hobby level 3D printing. Its probably from years of working with students who ask for help with poorly designed, printed parts trying to implement poorly thought out ideas. Note to the reader; drilling and tapping a 30% infilled part never works, no matter how many student groups try it. I wanted to try it anyway, what could go wrong. My first 3D printed design I stopped only halfway though; I really wasn't happy with it. I was still in the mindset of machining and weight saving; trying to make the parts and thin and light as possible.

First 3D printed version of rack mount modules 
You can probably see why I stopped. All the thin walls and tabs were too liable to snap off. It also would require a lot of support structure underneath due to a rim running around the underside. The model tree structure was also a mess and I had new ideas on how to structure it. I still didn't feel good about how I was designing it. Taking a pause, I thought about what I really was trying to do, not how I was going to do it. I started a new model with the goal of creating models as if these were going to be mass produced. What materials and techniques would be used then?

Some basic facts: it would be injection molded, it would most likely be out of glass filled nylon, it would most likely have torsional stiffness issues. These were the bases I needed. Attacking it again I got version 3.

Second 3D printed version of rack mount modules
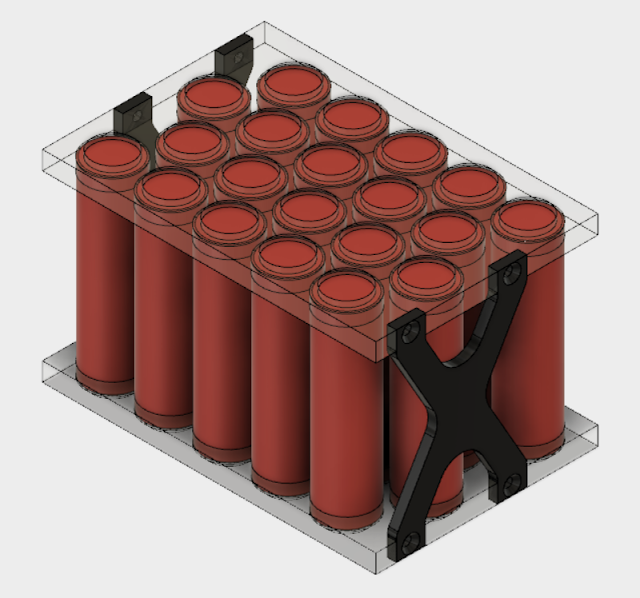
I am very pleased with how version 3 came out, even though I already have improvements in my head. All the cells are parallel with each other, with spaces between for air flow. The contacts of the cells are soldered to copper bus bars under the front and rear covers. Both of these bus bars terminate in the tab on the front right of the module, where they attach to insulated copper pins that plug into sockets on the rack mounts. The tab is offset to allow two modules to oppose each other and use a central set of sockets.

Half the battery pack. Note how all the tabs nest together. 
All of these modules are connected in series
Layout of sockets on the rack mount
The connection pins are surrounded by a plastic tube to prevent accidental shorting. As these modulus are going to be removed regularly, its very important the modules are safe. The sockets on the rack mount have a unique shape. They allow for modules to be connected in series with appropriate polarity and allow the same packs to be used on either side of the sockets. I will most likely have a post in future with details and models of the sockets and rack mount. This central set of sockets would also have LEDs, one for each module to show the rider which modules have the lowest voltage and need to be charged next. The central sockets will also have spring contacts to connect to the module for temperature monitoring.

I at first planned to use RTDs of some kind, but this would require additional analog inputs on the micro controller. Thinking about how I would process these inputs, I realized all I would be doing is monitoring them in reference to a threshold value. I don't need a micro controllers for this, I can just use digital thermal switches wired to digital inputs. Only two contact are needed for multiple switches to be wired in parallel. If any run over temperature, the circuit will close causing a system shutdown.

The high current pins with their protection. The two small holes will receive press fit copper contact for thermal switches
 The front and rear frames are deeply ribbed to improve their area moment of inertial to reduce deformation. I also tried to make the connecting surfaces between the two frames as large as possible to increase stiffness. The two halves are held together with 6 screws specific for plastic. The square grooves on the outside edges are for the rack mounts. 6mm rails will be on the racks and the modules will slide into them. The filled in sections near the corners on the rear frame in the photo below is to allow for a place for the cover plate screws to attach. I also predict the corners will get abused a lot, so I made their walls thicker.

Rear frame. Note deeply ribbed and crossed base section
Front and rear frames assembeled
The copper bus bars are distinct to each side. To run power from the rear from to the front frame where the connectors are, a thin piece of copper runs up the bottom of a rail groove. This is fairly well sheltered so I am not worried about shorting. I also plan to cover this run with a thick piece of Kapton tape just to be safe. The batteries will be soldered to the copper bus bars with small jumper wires. The jumpers will be sized with a fusing current around 5-6 amps. This is a safety measure in case any cell is over current. The wire will melt and disconnect the cell. This is similar to how Tesla builds their batteries. The bus bars will just be held in place with some hot glue or CA glue. On the front frame the two bus bars get pretty close to one another. There is a least a 5mm air gap. I'm not worried about this because the bus bars wont move, and there is at most a 4 volt differential between these bus bars. There is very little chance of anything happening.

Upper bus bar showing the termination points in the lower right on the tab
Detail showing rear bus bar running up the bottom of a rack mount groove 
The front and back covers serve just to cover the bus bars and are held on with smaller versions of the designed for plastic screws. Fasteners will cost a lot for these modules. I already know how I'm going to eliminate 4 from the next design iteration, but I refuse to save money by buying phillips or slotted head screws. I won't do it. All in all the pack is very light, weighing in at 1.47kg, with only 80g of that being the plastic frames and copper bus bars.

Like I mentioned I already have ideas to make this design more reliable, use fewer screws, and have easier to assemble bus bars. I also need to incorporate a handle somewhere to allow easy removal from a slot in the rack. I also worry the tab holding the high current pins will break, but talking to manager of our maker space, he assured me there is little worry of it breaking. The next design will include the basic structure of the central sockets as well as the battery packs.

Saturday, April 28, 2018

One Day Build: Carbide Foot Depth Mic

When cleaning the shop where I work one day, I found an old Tesa micrometer head. It was very unique as the sleeve was graduated only in 0.1 inch increments, not the traditional 0.025 inch. The thousands indication was instead done with a set of rotation indicators behind a window that ticked off every 5 thousandth. The micrometer was also graduated in 0.0005 inch increments with a 0.0001 vernier. Its a very beautiful and high quality tool but it had be abused and left in disrepair; the locking screw was missing, it was quite dirty and gummed up. I took it into my care and after a disassembly, cleaning, adjustment and a homemade replacement part, it was good as new.


Now what do I do with it? I have a very accurate outside micrometer already. I decided a depth micrometer would be very useful, especially when grinding thin parts on the surface grinder. Even though this micrometer head is intended for outside use, you can still measure depth by subtracting the read measurement from 1. The issue with using it on the grinder is it will stick to the chuck. Simple solution; use carbide.

The body of the is foot hardened A2. It was all machined out of my head, no drawings or CAD. I tried brazing the carbide blocks in but we just don't have the right type of flux where I work and I ended up having to remake the steel part. As a substitute for brazing I glued the blocks on with Loctite 380. All sides were ground after the glue cured.


The micrometer head is held in with a split pipe thread bushing. With pipe threads being tapered, if you cut a slit in a male pipe fitting, the fitting will collapse as you tighten it. After grinding I very carefully trammed a milling machine and took a skim cut on my fixture plate. I clamped the foot down flat to the fixture plate to ensure the bore I put in the bushing was as close to square to the bottom face as possible. Under slight pre-tension, I bored the brass bushing to fit the micrometer head.

Assembly was straightforward after that. I set the micrometer head within .005 inch in the bushing, then used the sleeve to zero it. The tool has a very consistent repeat reading. I checked the accuracy with gauge blocks and the reading is spot on. The issue I did find was the foot has a .0006 inch convex bow in it. This changes the micrometer reading depending on which side of the foot you apply pressure to. I want to fix this in the future but I can only see doing this through lapping. I don't have any lapping equipment right now. However, under normal use the tool still is very usable, and most importantly doesn't stick to the mag chuck when grinding.

Transverse Flux Motor V6

This is part of a larger project I started in some free time over the last summer. I was on co-op with a company working on a hybrid system. Being exposed to the industry made me realize that what i thought was the gradual and eventual transition it hybrid and electric vehicles isn't happening as fast as I thought. I always had an interest in electric vehicles because of their emissions potentials and because they are quiet. I decided to get back into electric vehicles. My school has a few electric vehicles and hybrid electric teams. I have tried attending meetings with all of them and talking with team leadership about team vision and plans. While I believe the teams are doing some really cool work, I find myself incompatible with the team cultures and operation models.

I instead decided to design my own electric vehicle. Cars are cool but I already have a car, so I don't really need a second one. Cars are also very challenging to build them road legal, let alone finding someone to insure you. For a while I rode a 1982 Honda moped and loved it. Eventually I sold it when I moved and I've really missed it. In my area, you don't need a motorcycle license for a moped and they are required to be inspected. They are also much easier to be insured. So I started sketching and brainstorming for a small electric moped.

I want to design everything myself; battery, BMS, motor, motor controller, frame. This post focuses on the motor design I settled on and the first version of the model I developed. I began by reading research papers. There is a lot on forums about motor design but much of it lacks solid engineering fact behind it; research papers provided the detailed information. Traditional laminated core in-runner motors I decided were too complex to build, even though they were the most common. They require a lot of reliance on outside vendors to cut the laminations, and a ton of time winding the slots. I wanted something simple and easy.

Reading research papers about various motor designs, I found something called a transverse flux motor. Originally an in-runner motor, I decided an out-runner with a Halbach array would give the highest torque density. After playing around with 6 different sizes and configurations, I finished a small scale model of the motor described. This motor only has two phases as that is all that is required. It is designed much like out-runner motors found in model aircraft.

Finished transverse flux motor

Finished transverse flux motor with rotor removed, only one phase is shown.
 Each phase has only one large coil. Interlaced around it are small horseshoe shaped laminations. They alternate inside and outside the coil, causing a reversed polarity on each horseshoe. The two phases are offset by halve a phase so no offset would be required in the magnets in the rotor. The light grey annulus is the mounting surface for the motor. The horseshoe laminations key into this mounting structure and and spaced apart by plastic insulators. The two phases are held in place by a lock nut on the back of the mounting structure.

Cross section of the phase, blue lines show where the copper winding would be
 The rotor is made of a single tube of plastic, slotted internally to space out the permanent magnets. Its a very unconventional design and difficult to prototype, but it is the best way I could think of doing it without laminating it. On the rear end is a cap with the main bearing in it. This bearing seats on to the stator via the phase lock nut. A small aluminum ring is pressed into the opposing side of the rotor to prevent possible collapse or deformation of the plastic tube. This design really needs a second bearing for support at one end or the other.

Motor rotor, note the complex fin shapes in the plastic tube and the single, large bearing


I ultimately rejected this design because of the complexity of the rotor, and the wiring of the leads out of the phase. With how I wanted to build it, large or small, there was virtually no space to run the power leads from the rear most phase to the mounting flange. I eventually decided to move to an axial flux motor design. There are many documented cases of axial flux motors performing to very high standards while there are virtually none of transverse flux motors preforming at high levels.

My designs for axial flux motors will be featured in future posts.